How To Install Electrical Sub panels
In case the service panel doesn’t have adequate room for installing new circuit breakers, and you’re unable to make use of tandem breakers, installing a subpanel may be the ideal choice. Subpanels connect to the main service panel with thick three-wire cabling. A feeder breaker in the main panel’s primary function is to act as a disconnect for the subpanels. Before installing the feeder breaker, make sure you consult with the inspector to ensure that you’re not overloading the main electrical system.
An inspector which will expert in commercial and residential wiring will approve the subpanel, feeder cable as well as the feeder breaker.
Before you begin, the main breaker must be shut off in the service panel. The job generally takes about two hours and will involve stripping of wires and some electrical skills.
Tools Required For The Job:
- Long-nose pliers
- Screwdriver
- Voltage tester
- Flashlight
- Hammer
- Strippers
- Lineman’s pliers
Materials Needed:
- Subpanel
- Approved feeder cable
- Cable clamps or staples
- Mountable screws
- Breakers for the new circuits
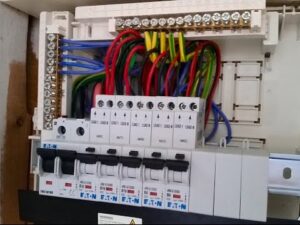
Step 1 – Mounting The Subpanel
The subpanel must be installed about a foot away from the main service panel, and you must first determine the distance that the wires will have to travel through the subpanel and pull wires before adding the cable and strip sheathing as needed. The knockout slug needs to be removed, the wiring slid through, and the cable then clamped.
Step 2 – Plan Route
The route for the four wires (ground, neutral and two hot wires which is black and red) must be planned at the main service panel. The sheathing must be stripped, the knockout slug is removed, and the cable clamped. Ensure you route the ground and neutral wires carefully after which the bus bars are connected. In a well-wired panel, the wires are routed in neat paths around the perimeter to make it easier to distinguish which wire is going to which breaker and can avoid the wires from touching hot bus bars which can result in a serious fire hazard.
Step 3 – Stripping Wires
The red and black wires must be routed, cut and stripped before they are connected to the feeder breaker, then snap the breaker into place.
Step 4 – Connecting Wires
The route wires must be routed, cut and stripped in the subpanel and connected to terminals. Then, the black and red wires need to be connected to the hot bus bars, the neutral wire connected to the main neutral terminal and lastly the ground wire connected to the ground bus bar.

Step 5 – Finish Connecting The Wires
Run the cable for new circuits into the subpanel and then clamp the cable.
For each circuit:
- Route the wires around the perimeter
- Connect the ground wire to ground bus bar
- Connect the white wire to the neutral bus bar
- Connect hot wire to the circuit breaker
Contact us today on (08) 9220 5201